I often experiment with custom white balance settings in my camera when photographing landscapes as a way of helping me refine my images. I use it to both explore colors creatively and to help with determining if a scene is worth investing my time to photograph. Many times, subtle and not so subtle changes to the camera's white balance setting yields new ideas and more interest in what i'm photographing. Being fully engaged with what you are photographing is probably the most important thing. If you are not engaged, your viewers won't be engaged, and that will show in your image. Using the custom white balance settings in your camera is a great way to explore and expand your photography.
Since I shoot digitally, changing the white balance of an image before I take it is so simple. I don't have to carry and fumble with multiple color filters as film shooters do. With just a few menu and button presses, I can go from a feeling of calm and cool to warm, hot, and vibrant all in the same scene. I thought of using actual color filters to produce the same results but I found an issue in post production where it can be difficult if not impossible to adjust colors to my liking. Since I shoot RAW images and use Adobe Camera Raw (ACR) to help process my images, I can change the white balance settings of the photograph after the fact just as easily as I can with my camera before I captured the image. In fact, ACR really stretches the limits and allows me to go into territory that my camera simply won't allow me to go to with white balance.
Maybe now you are sold on the idea of how beneficial custom white balance settings can be, now I'll explore just how I use them.
On the left is an image taken in Corson's Inlet near Ocean City, NJ one evening, just after sunset, when high tide was receding in the tidal marsh. There's lots of water and lots of sky so the tones and colors are very similar throughout the entire image. This image is shown with the white balance in my camera set to Daylight, which is about 5200K. ACR displays this as 5000K and -8 Magenta.
By the way, I took this with a Nikon D700 and while i'm not familiar with every other camera brand with regards to custom white balance settings, the numbers won't always match up with mine but through experiment and trial and error, you can achieve the same effects here.
In the image above, what words would you use to describe the colors and tones?
Cool? Subtle? Smooth? Relaxing? Soft? Blue?
Those are the types of colors and moods you get after sunset because all we have now is reflected light and no more direct light from the sun.
Soft and
blue are how I would describe it. As twilight settles in, everything becomes more soft, subtle, and blue until there is no more light left and all we have is darkness. At the time of searching for this image and taking the photograph, I was not feeling soft and subtle and blue. I was feeling vibrant and thrilled standing in a wonderful water world that seemed out-of-this world! A beautiful burst of color was directly above me in the clouds and the reflected light in the water was begging to be captured. The question was at the time, how could I better capture that thrilling and vibrant feeling in an image?
A custom white balance setting was how!
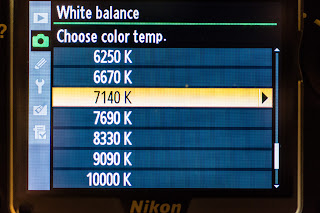
This time I changed the white balance to a custom color temperature of 7140K and then used the fine-tune grid option to introduce more Amber and Magenta. Those settings are A6 and M6. In ACR this image shows as 7450K and +78 Magenta.
The Amber and Blue axis of the fine-tune grid in my Nikon D700 doesn't apply another type of filter. It simply shifts the actual color temperature up or down. This is evident because the custom white balance in the camera was set to 7140K, A6, M6. Fine-tuning the white balance for Amber 6 and Magenta 6 now indicates a color temperature of 9090K. However, in ACR the corrected color temperature is 7450K and +78 Magenta.
What words would you use now to describe the colors and tones in this image?
Dreamy? Vibrant? Unworldly? Exciting? Purply?
This new image is much closer to what I was
feeling when I was taking the image and what I wanted to convey. By deliberately introducing a color cast by fine-tuning the white balance in the camera, I am able to change the feeling of the image and more closely deliver what I wanted in the image.
Below is the final image after post-processing. Just a subtle shift in color temperature again and this time to enhance the blues and purples more. In ACR the color temperature is 6200K and +80 Magenta. The shift to a cooler temperature is what is responsible for bringing out the blues and purples more.
Now the one question you may be asking right now that I don't have an exact answer for is, how do I know what color temperature I should use?
You have to experiment. You have to try both when you are taking the photo and then when you are post-processing the photo to see the endless possibilities that are out there. Through trial and error and experimentation are how I usually arrive at a particular setting. Who knows, maybe sometimes when you are in the field taking photographs you later find something more pleasing in post-processing that differs from what you originally envisioned and captured. With the freedom of shooting RAW and software such as Adobe Camera Raw, you are not ever limited or penalized by choices you made when you took the photograph.
There is of course one rule of thumb, so-to-speak, that I can offer that you can use to help with your decision making. Lower temperatures are considered
cooler and thus will often yield images with a blue-ish cast. Higher temperatures are considered
warmer and will yield images with a golden or yellowish cast. Where things get interesting is when you fine-tune the white balance and you apply a green or magenta cast.
I often apply more magenta when I experiment with white balance. It does a great job of enhancing both red and pink tones and purple tones, depending on what the color temperature is. With cooler temperatures (e.g. 4500K) and a magenta cast, you'll often see deep purple tones. With warmer temperatures (e.g. 6500K) and a magenta cast, you'll often see pinkish tones. I don't often use the green filter in situations such as the one depicted here. However, I can definitely see a benefit with scenes deep within a forest or canopy of lush greens where using the green filter could work.
Results will greatly vary depending on your subject and the lighting of course. These techniques probably won't translate well to portraiture work! Here are a couple of more examples.
These three images were taken a little while after sunrise with some beautiful alto-cumulus clouds in the sky creating a sort of
sun pillar effect.
The first image on the left demonstrates what Auto White Balance looks like. ACR reports this as 4000K. Here you can say everything is very
blue and
cool. The colors in the sky and the clouds were much more brilliant to my eye than this. Its fair to say that this isn't an accurate representation of how that morning looked and felt.
The second image demonstrates a Daylight White Balance setting. ACR reports this as 5500K and +10 Magenta. While there is a bit more color than the first image, it still lacked the punch and vibrancy that I actually saw and felt that morning. Getting there, but not quite all the way there.
The third and final image in this example is the custom White Balance setting I used to take the photograph. This was 5000K, A6, M6 and ACR reports this as 5850K and +76 Magenta. Here now we can see the colors go wild and really draw you into how magnificent that morning really was. Alto-cumulus clouds are some of the finest clouds to lay eyes on and when you couple that with a rising or setting sun, get ready for a wild ride with mother nature nearing her best! Since the colors were so vivid already, I didn't have to raise the color temperature beyond 5000K to really get the pinks and the purples to come alive when applying the Magenta filter.
These two images were taken in the twilight before sunrise. There was a good bit of low clouds on the horizon where the sun would rise and this helped block some of the early light and it seemed to extend twilight just a little bit longer for me.
The first image of two was taken at Daylight White Balance. ACR reports this as 5000K and -6 Magenta (or +6 Green). To me, this again was not an accurate representation of what I was seeing. Deep twilight is very
cool and
blue and the colors here make me think more of a
sea foam green.
The second image is what I took with a custom White Balance. ACR reports this as 4150K and +33 Magenta. By lowering the color temperature and adding a magenta filter I was able to extract a much cooler and softer glow from the scene than previously. Here we see deeper blues and purples with a lower color temperature and some magenta added.
In conclusion...
Don't be afraid and experiment with custom white balance settings both when you are taking photos and afterwards during post-procesing. Don't be afraid to push the limits sometimes and try extreme color temperatures such as 2500K or 10000K or really push the sliders with magenta and green. There are tons of creative possibilities waiting out there and it never hurts to experiment. So give it a try and have fun with it next time you are out capturing the landscapes!


